The Producer’s Seat: Five Ways to Make Sing! Work For You
The Producer’s Seat: Five Ways to Make Sing! Work For You
You’ve mastered your mic technique. You’ve run through a few songs and are starting to get a feel for the unlimited amount of fun you can have simply by using your own voice. Maybe you’ve even built your very own home Sing! studio. These next 5 tips will help get you into the producer’s seat and get the absolute best sounding performances you can out of Sing!, and out of yourself. Read on to find out how to get a pro-level sound.
1. LISTEN UP!
Yes, we’ve said over and over again that your voice is the most important thing when using Sing! But we should also mention that your hearing is even more important. Sing! works best when using headphones, and since you will have sound and music pumping into your ears, make sure you are using safe listening levels and eliminating feedback. Finding the right balance between your device volume and the vocal monitor volume is key to ensuring healthy listening. Remember, your ears can get tired as well, so take a break once in a while and enjoy the silence.
2. Hum a few notes for me, will you?
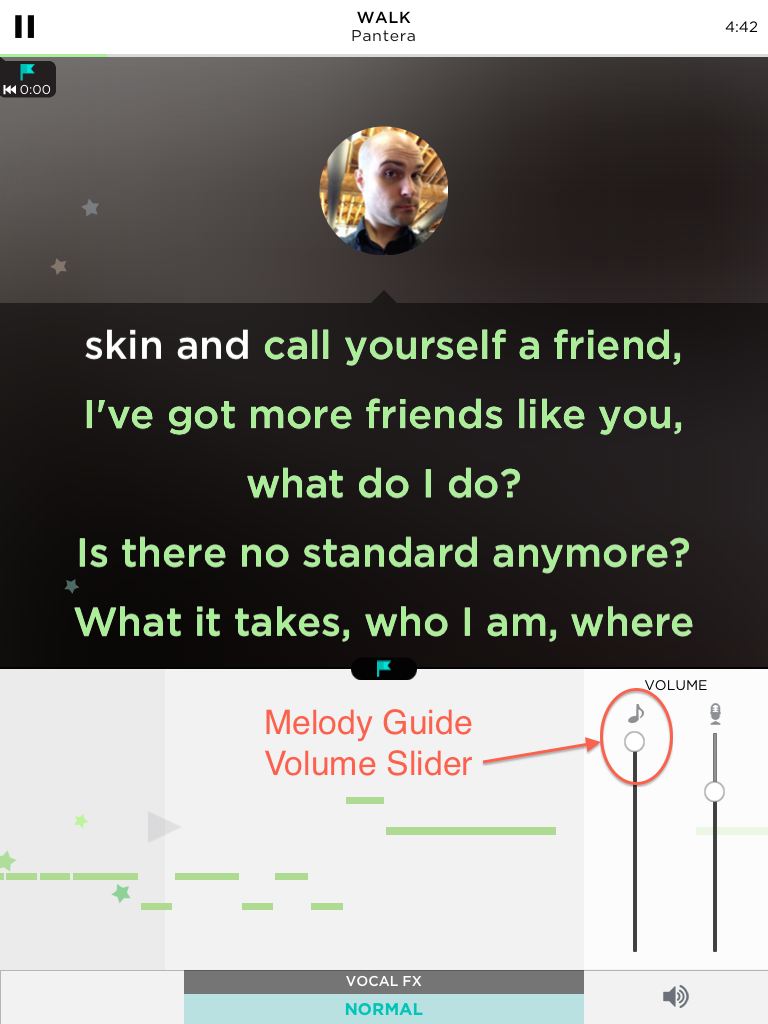
How does that tune go again? You may find yourself starting a song and completely forgetting how it goes! Fortunately, Sing! provides you with some training wheels. In the recording section, there’s a volume slider that controls a Melody Guide* to help you through the song. The Melody Guide will simply follow the pitch lines in the song. Use this to help you remember those tricky parts of a tune you forgot about. You can turn the Melody Guide volume down once you feel you have a hang of the performance.

3. Yes, Virginia. There is a rewind button!
I’m sure most Sing! users have had the experience of being on the verge of nailing down a spectacular performance, then flubbed a lyric. Or lost the melody. Or sneezed. Good news – Sing! lets you go back to a section of a song you may be having trouble with, or maybe didn’t quite come out as well as you wanted. When you click on the lyrics portion of the recording section, a checkpoint is added on the song timeline. You will see a little flag on the timeline. When you click on that flag, Sing! will go back to the section you “bookmarked,” allowing you to retry the song from that point. Dreading that upcoming note? Create a checkpoint right before the section, and you have an opportunity to keep trying until you own it!
4. We hear you, loud and clear!
In our last post, we told you about the best way to handle your device when singing, or when using a peripheral device such as a headset mic or USB mic. This enables you to control your volume when using Sing! However, the app also does a lot of heavy lifting for you. Sing! uses an auto-normalization process to ensure a good recording for every performance. So, if you happen to be singing too loud or too soft, Sing! can detect this using “audio mathemagic.” It will then level your volume so that if you have to belt out a note or whisper a melody, you still have a clear, even volume level, free from distortion or other audio defects. Of course, Sing! also gives you a volume slider on the review screen, to give you a chance to manually tweak your performance volume just a bit, so you can be happy with the tune you’re about to unleash upon the world.
5. Paint with your voice!
Now you’ve done a killer rendition of one of your favorite songs. But something still doesn’t quite sound right. Maybe the vocals are too dry. Or maybe you think you should add a little more oomph to your voice. Fear not! Sing! provides you with a selection of vocal effects that you can apply to your voice while singing. It’s like choosing a different brush when painting on a canvas. Your voice is the color, the song is the canvas and audio effects are the brushes. Vocal effects give your voice a different sound and feel, and can even change the way you are interpreting your song. You can choose any vocal effect while singing and in review, such as “Pop Star” for an auto-tune sound or “Studio” if you’re feeling like going big and bold. The default setting in Sing! is “Normal.” To hear how these settings sound, click on the links above for examples. So play around with them. Once you’ve found the perfect fit, then when you save your song, that effect will be applied to the final performance.
You’ve got the vocal basics down, you’ve learned to master recording into Sing!, and now you have your own seat at the mixing desk. Sounds like you are ready to start joining others on their Sing! journey. Get ready folks, because next week, we are going to help you find ways to join others, and create some beautiful music together. Just remember to keep singing!
*Note: The Melody Guide volume slider and rewind function are only available for iOS devices for now. But rest assured, we are working tirelessly to bring these features to the wider Sing! world. Keep an eye out!
– Keith Houston, Smule Q/A Engineer, Karaoke Host

